One of the most common questions I receive at shows is
“How do you draw an eye?” usually followed by
“…and make it look real?”
Well, there’s a long answer which would involve talking about reflectivity versus absorption, varying textures, pencil grades, layers, etc., and then there’s simply showing what I mean step-by-step. This post will attempt to explain the process by
walking you through a 15-minute drawing and how I go about drawing eyes.
This drawing was done on
Canson’s Illustration Art Board with a
0.5mm mechanical pencil with
2B lead. I also used a kneaded eraser to lighten my guidelines created in STEP 1 and to remove a bit of detail in STEP 6. I used a reference photo of my youngest dog, Peanut, who is both a capable dog model and endless source of amusement.
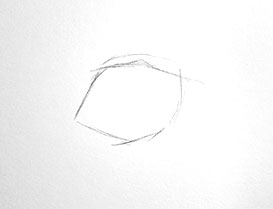 |
| STEP 1 |
STEP 1: The first step is to
define the basic eye geometry. For those familiar with drawing, this is a simple step of looking for angles and slowly sculpting in the boundaries of the eyes. For those not adept at drawing, this is probably an important place to say that I spend more time practicing this stage than any other in my sketchbooks. Artists refer to this stage as “learning to see”.
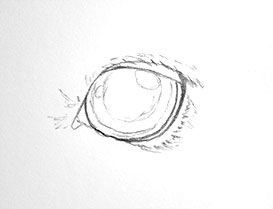 |
| STEP 2 |
STEP 2: Once the initial blocking in is completed it’s time to turn your attention to the structures in the eye. This is where you
start looking for the basic details that comprise the eye. The iris, upper and lower lids, pupil, highlights, etc. This phase is still very similar to the blocking in phase except I’m no longer using simple straight lines and curves, I’m
starting to sculpt in more refined details but not worrying about exactly where items intersect or extend behind other objects.
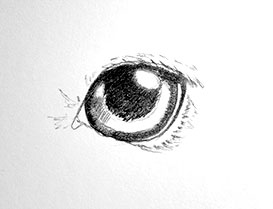 |
| STEP 3 |
STEP 3: Now we can begin turing our attention to the actual tones in the eye itself. We start very simply
looking for the deepest shadows and blocking them in. I really want to focus my artistic eye at this phase, frequently squinting at the drawing and ensuring I’m creating interesting geometry in the piece. I don’t want perfection at this point and I don’t want to overwork the paper, I’m simply
blocking in the darks and finding out where things will disappear into shadow and where they will be emerging into light. This is where I really
start to apply light to the 3-dimensional wire frame I created in the previous stage.
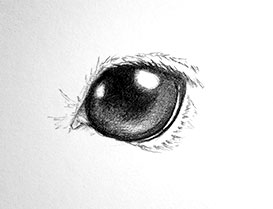 |
| STEP 4 |
STEP 4: Now we want to
create some mid-tones to provide the masses in the drawing that lie between the shadows and the highlights. These begin very simply with constant checks against the subject or reference photo. You’re looking for where the
light rolls out of shadowed areas into highlight areas. For me, I really try to avoid large areas of solid mid-tones in a drawing. I’m constantly searching for gradients where the light is brightening or darkening, really pushing the 3-dimensional nature of the subject.
 |
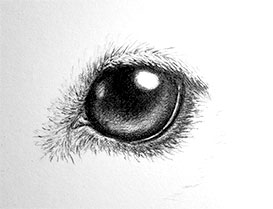
| STEP 5 |
STEP 5: Now that the basic tones are established in the eye, we can begin moving into the adjacent areas
building details up in layers. Fur is the subject of a future How To, so I won’t go into a lot of detail here other than to say, take your time with fur and vary your pencil strokes both in pressure and in length. The eyelids in this stage are further refined, the inner tear duct is shaded and the upper lid hairs are defined and refined in several layers building the tones slowly.
 |
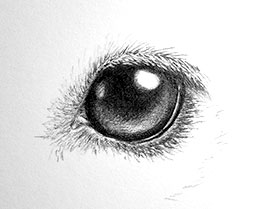
| STEP 6 |
STEP 6: Final touches are applied the the iris, pupil, lids, and hairs. You might notice that I’ve lightened the hairs on the top of the upper lid to give the appearance of highlights in that area. You’re really trying to bring the elements together in this final stage. There’s no right or wrong answer for a lot of tweaks, you have to trust your eye and
refine things that look weakly developed and remove details in areas that look too distracting. This is where I can spend a lot of time making a change, stepping back and checking it, squinting at the drawing, changing it back. This push and pull can be frustrating but you’ll eventually bring it together into a pleasing finished piece.
I hope this tutorial helps give you some ideas on how I draw eyes. There are a lot of different approaches, but these steps are fairly common among pencil artists. The basic idea is to:
So to recap,
you’ll want to follow this basic format when drawing:
1) establish the basic geometry of the subject
2) block in the basic structures while thinking in simple 3-dimensional terms
3) establish your main shadow areas, these create interesting geometry in your piece
4) create mid-tones and look for gradients when shading in the remainder of the components
5) refine your mid-tones and establish additional details for interest
6) apply final tweaks to the various elements to tie everything together
Feel free to post comments or questions. I’ll do my best to better explain things that might remain confusing or simply provide additional details on how certain techniques are applied.

No comments:
Post a Comment