Friday, March 11, 2011

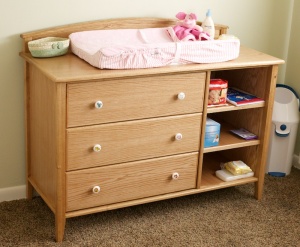
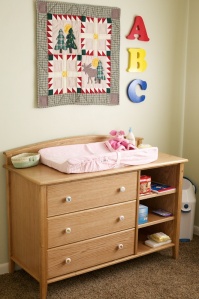
The new changing table I just completed

I’ve been busy over the winter learning furniture construction. I recently completed a new changing table for our nursery. It’s made of red oak and finished with a blonde shellec top-coated with water-based polyurethane. I was fairly pleased with how it turned out. I chose a lighter finish to keep the furniture from feeling too massive. I’ll be moving on to a convertible crib / full-sized bed design this weekend.
New changing table installed in the nursery.
I also made the letters on the wall above the changing table. I found a nice font I liked on my computer and printed out huge versions of them which I transferred to a sheet of MDF using a carbon-transfer paper. I then cut them out with a jigsaw, sanded them smooth and coated them with acrylic spray paint. I tried using liquid acrylic but the yellow and blue were far too transparent.
The photo below shows a closer look at the table with one of the hand-painted knobs that I purchased for the drawer pulls.
Closer view of table.
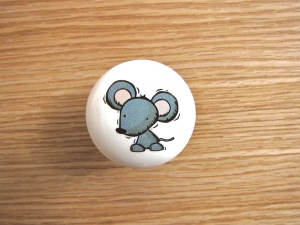
One of the wonderful animal-themed drawer pulls.
I picked up the drawer pulls from Carolina Hardware and Decor who have a great selection of decorative pulls and knobs, many surprisingly still made in the USA. I used a mouse, bunny, bull, pig, lion, and tiger for the dresser.
Refinishing my Grandmother's chairs

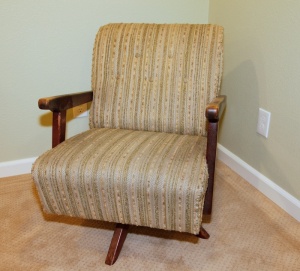
Chair #2 prior to the start of the process
I inherited two identical chairs from my grandmother’s estate when she passed away several years ago. They have been in need of a refinishing job since we obtained them and I am finally nearing completion on the work. I decided to refinish the wood myself and have a professional upholsterer work on the fabric since I had no idea where to even start on something like that.
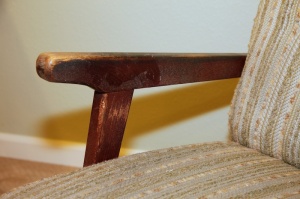
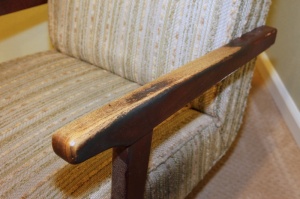
The arms were in desperate need of refinishing
The well-worn arms with years of happy use.
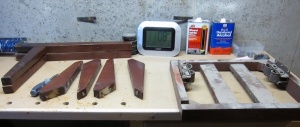
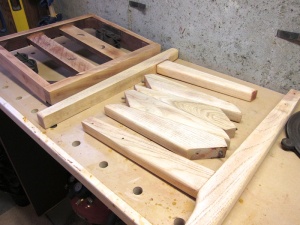
The chair was ready for disassembly. After “carefully” removing the upholstery from the back, I disassembled the chair into the components.
The disassembled pieces.
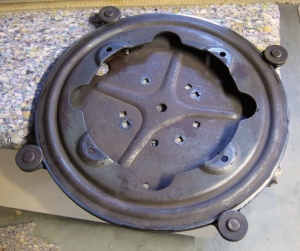
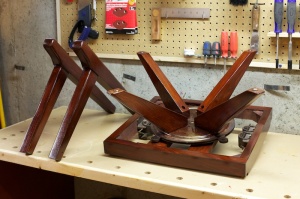
The swivel-rocker component from the chair base.
Once the components were disassembled, I deployed the random-orbit sander for some tough love.
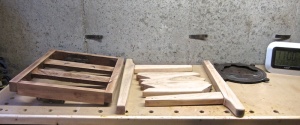
The sanded components.
A closer view of the arms, legs, and base.
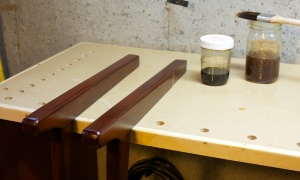
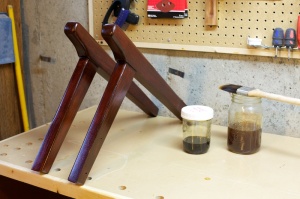
Here are some photos of the progress as it stands today. I’ve managed to strip both chairs down to the raw wood and reapply an oil-based chestnut stain to give a pleasant reddish tint to the wood. I then followed this up with a sealing coat of garnet shellac before applying a liberalglaze of mahogany stain. This step was crucial to the overall look of the arms and require several days of fine-tuning the final look. I then sealed this layer with several (probably 5-7) seal coats of garnet shellac before finishing the job with three coats of water-based polyurethane. I was able to use water-based poly over the previous coats because I allowed 3-4 days of drying time for the oil-based finishes and then used shellac, which provides a material buffer between coats.
The first seal-coat of garnet shellac is applied.
A better view of the shellacked arms.
The re-finished arms, legs, and base from the second chair.
My goal was to stay true to the original finish while bringing out the natural grain in the wood a bit more (less of an opaque glaze with this application) and keeping that deep, rich finish I’ve always loved about these chairs. I should be getting the seats back from the upholsterer in the next week or so and can’t wait to see how the fabric we picked out looks with the new finish.

Thursday, December 16, 2010

Hiker's Companion playing cards are here!

10 months of work to get the drawings ready for this deck. I think it turned out great. Thanks toInkstone Design, Inc. for selecting me for the illustrations.
Here is a link to the product page on my website: http://www.richadamsphoto.com/Drawings/PlayingCards.html. They’re available for $12.95 and are shipping soon!


Wednesday, December 8, 2010

Yellowstone Drawing Workshop - June 2011!

I'm excited to announce the return of Mike Sibley (my friend and mentor) to Yellowstone for a drawing workshop in June of next year. Some details include:


Dates:       12th -17th June 2011
Duration:  6 days, 10 am to 5 pm
Location:  Holiday Inn, West Yellowstone, Montana

  • Illustrated talk by a Park Ranger so we know what to expect and look out for during our visit to…
  • A full day in the Park with assistance on photography, taking that unusual but useful shot, and looking for elements that can be combined into a useful setting. And we provide transport and lunch.
  • Improve your photography – late afternoon sessions by talented Artist and Photographer Rich Adams beginning with the basic uses of compact cameras.
  • Visits to the nearby Grizzly & Wolf Discovery Center to get those photographs that eluded you in the Park.
  • Five days of uninterrupted drawing covering drawing from the basics up to advanced.
  • AND all tools and paper will be provided. Just bring yourself.
To find more details and to sign up for the workshop, please head on over to Mike's website:

This workshop is limited to just 25 artists to ensure individual attention, so head over now to the workshop page and fill in the “Keep Me Informed” details to make certain of receiving the newsletters.

I'll be posting more details on the workshop and what to expect as an attendee over the winter.

I hope to see you there!

Monday, November 1, 2010

Dinosaur Sketch


My wife and I attended the Montana Festival of the Book over the weekend and attended Jack Horner's presentation about his newest book How to Build a Dinosaur. I had my Moleskine journal with me so I started doodling one of the dinosaur images at the beginning of the presentation and was able to finish this small sketch before the presentation was completed. He was kind enough to sign my drawing along with my wife's copy of How to Build a Dinosaur. It's always a treat to meet an author we especially like and we found that Dr. Horner was a very approachable and patient person.

I had been lucky enough to attend a symposium in Bozeman, Montana (the home of the Museum of the Rockies, where Horner is curator) and listened to another presentation for the Guild of Natural Science Illustrators before leading us on a field trip to the Museum of the Rockies where we were given a behind-the-scenes look at the efforts that go into creating and preserving the many exhibits at the museum.

It was one of those experiences that makes you say, "If I ever got the chance to work here, I would be in heaven." Unfortunately I don't know how to weld, have never cast a bone in a silicone mold, haven't created exhibit displays where the specimen can be removed for study and reinserted without causing damage to the display or, more importantly, the bones themselves. Needless to say, I'd need a few more qualifications which is why their current exhibit coordinator is so unique. It's a great museum and well worth the visit if you even happen to be in Bozeman before traveling down to Yellowstone National Park.

Thursday, October 28, 2010

New drawing completed: Raven Study


Just in time for Halloween, here is a link to my web page with a recently completed drawing of a Raven. I tried to play around with the graphical elements of the raven to produce a dynamic pose even though he’s perched on a static limb. By spreading the feet, lowering the center of gravity and stretching the neck out just a bit, I hope it imparts a feeling of potential action that I was going for.


The print is available in both 11×14 and 16×20 frame sizes and printed on 100% cotton rag fine art paper with pigment-based archival inks.

Plans for our basement renovation

I’ve been working on the plans for our basement remodel for the last couple of weeks. I ran across a great application by Google called SketchUp. It’s a great application to create 3-dimentional models and it’s FREE! It took a bit to learn the application and I would highly recommend anyone interested to view all of the online tutorials before diving in.


Our basement is partially finished and we’ve been making due with cold concrete  and really inadequate lighting for quite a while. Our new plans will involve the finishing of two separate rooms, one a smaller bedroom that we’ll use for framing and matting and a large common room (shown below) that we’ll divide into an area as an indulgent reading room along with a separate office / studio space for myself. I’ve included some images from the SketchUp program showing our current plans.

Wednesday, October 27, 2010

Raven Study study

I hope you'll excuse the quirky title for this smaller sketch. I am nearly finished with a raven drawing that I've been working on for the last couple of weeks. It's taking me so long because we are beginning the process of remodeling our basement and I've been developing the architectural drawings for the contractor. I'll try to create a separate post to talk more about this process.

Turning to the sketch, the first thing I'll comment on is the paper selection. I am a paper nut and have a large 14"x17" portfolio packed with numerous different papers (I believe there are 15 or more different papers in this single portfolio and I have another!). I use different papers depending on the subject, the size of the piece, or simply my mood for that day. This is one of those times when I went back to a paper that I seem to be drawn to whenever I really just want to have fun drawing a piece -- Arches Hot Press watercolor paper. I use the back side of the paper which lacks the laid pattern of the front side. It's a wonderful paper for pencil drawing because it's quite robust, allowing the artist to erase lines, lighten previously drawn areas, or simply scrub in some really beautiful darks.

The reason I selected this paper for the raven was that it allows an extremely wide contrast range and also allows me to create some intricate details at a fairly small scale. It seemed to work pretty well for this piece.

I am going to really try to use Arches more often as I really like the results I can obtain with it and it feels a lot more like sketchbook or drawing paper than bristol board. It's a little finicky with hard grades (2H or harder) but if you use a dab of blending with a tortillion occasionally, you can avoid having to use extremely hard pencils.

Tuesday, October 19, 2010

Currently reading...

A Short History of Nearly EverythingA Short History of Nearly Everything by Bill Bryson


Extremely accessible, appropriately amusing, and very informative. I am really enjoying the book and can say that Bill Bryson's understated wit is very engaging.


View all my reviews

Monday, October 11, 2010

How To: Dog's Eye Tutorial

One of the most common questions I receive at shows is “How do you draw an eye?” usually followed by “…and make it look real?”

Well, there’s a long answer which would involve talking about reflectivity versus absorption, varying textures, pencil grades, layers, etc., and then there’s simply showing what I mean step-by-step. This post will attempt to explain the process by walking you through a 15-minute drawing and how I go about drawing eyes.