Our basement is partially finished and we’ve been making due with cold concrete and really inadequate lighting for quite a while. Our new plans will involve the finishing of two separate rooms, one a smaller bedroom that we’ll use for framing and matting and a large common room (shown below) that we’ll divide into an area as an indulgent reading room along with a separate office / studio space for myself. I’ve included some images from the SketchUp program showing our current plans.
Thursday, October 28, 2010
Plans for our basement renovation
I’ve been working on the plans for our basement remodel for the last couple of weeks. I ran across a great application by Google called SketchUp. It’s a great application to create 3-dimentional models and it’s FREE! It took a bit to learn the application and I would highly recommend anyone interested to view all of the online tutorials before diving in.
Our basement is partially finished and we’ve been making due with cold concrete and really inadequate lighting for quite a while. Our new plans will involve the finishing of two separate rooms, one a smaller bedroom that we’ll use for framing and matting and a large common room (shown below) that we’ll divide into an area as an indulgent reading room along with a separate office / studio space for myself. I’ve included some images from the SketchUp program showing our current plans.
Our basement is partially finished and we’ve been making due with cold concrete and really inadequate lighting for quite a while. Our new plans will involve the finishing of two separate rooms, one a smaller bedroom that we’ll use for framing and matting and a large common room (shown below) that we’ll divide into an area as an indulgent reading room along with a separate office / studio space for myself. I’ve included some images from the SketchUp program showing our current plans.


Wednesday, October 27, 2010
Raven Study study

Turning to the sketch, the first thing I'll comment on is the paper selection. I am a paper nut and have a large 14"x17" portfolio packed with numerous different papers (I believe there are 15 or more different papers in this single portfolio and I have another!). I use different papers depending on the subject, the size of the piece, or simply my mood for that day. This is one of those times when I went back to a paper that I seem to be drawn to whenever I really just want to have fun drawing a piece -- Arches Hot Press watercolor paper. I use the back side of the paper which lacks the laid pattern of the front side. It's a wonderful paper for pencil drawing because it's quite robust, allowing the artist to erase lines, lighten previously drawn areas, or simply scrub in some really beautiful darks.
The reason I selected this paper for the raven was that it allows an extremely wide contrast range and also allows me to create some intricate details at a fairly small scale. It seemed to work pretty well for this piece.
I am going to really try to use Arches more often as I really like the results I can obtain with it and it feels a lot more like sketchbook or drawing paper than bristol board. It's a little finicky with hard grades (2H or harder) but if you use a dab of blending with a tortillion occasionally, you can avoid having to use extremely hard pencils.
Tuesday, October 19, 2010
Currently reading...
 A Short History of Nearly Everything by Bill Bryson
Extremely accessible, appropriately amusing, and very informative. I am really enjoying the book and can say that Bill Bryson's understated wit is very engaging.
View all my reviews
Monday, October 11, 2010
How To: Dog's Eye Tutorial

Well, there’s a long answer which would involve talking about reflectivity versus absorption, varying textures, pencil grades, layers, etc., and then there’s simply showing what I mean step-by-step. This post will attempt to explain the process by walking you through a 15-minute drawing and how I go about drawing eyes.
Thursday, October 7, 2010
Results from our new panini grill
We just purchased a new panini grill and here is the first sandwich prepared on it. It's a roast beef and cheddar with red bell pepper and basil. I think we'll keep it! :-D


Tuesday, September 28, 2010
REVIEW: Canson's XL Recycled Bristol pads

This new paper is Canson XL™ Recycled Bristol. It's a 96 lb (260 gsm) stock, is bright white, and according to Canson, is the first recycled two-sided paper (vellum on the front side and smooth on the back).
I've never used a recycled bristol board and my main concerns were the archivability and whether it contained optical brighteners. As a quick explanation, archivability is critical to ensure long-term preservation of paper-based art. It's simply non-negotiable for my work. An acid-free paper will resist yellowing and when properly matted and framed, will remain in great condition and lasts more than a lifetime (and sometimes several).
Optical Brighteners (OB's) are often used in recycled paper to bleach the pulp and make it more pleasing to look at. It's not inherently bad but it can have detrimental long-term effects for artwork because it can change subtly over time, most often dulling unevenly. It's a bigger issue with printer papers but can be found in fine art papers as well.
With these concerns in mind, I sent off an e-mail to Canson hoping someone might be able to answer my questions. I must admit that I had very low expectations that someone might respond. Interactions with other paper suppliers have provided some convincing evidence that their salespeople don't actually know a heck of a lot about paper. Well, I can state definitively that my fears were completely unfounded. I received a a detailed and thoughtful response from Michelle R. She not only answered my questions directly and with clear knowledge of the paper manufacturing process, she went well above and beyond by offering to send a sample of the paper so I could try it out. I was simple stunned.
The First Tests:
I'm happy to report that the paper is even better than I had hoped. I've included a couple of small sketches from each side of the paper. These are 200% enlargements so the grain is much more visible than in person.
First the Smooth (back) Side:

and the Vellum (front) Side, which has a nice tooth for tonal drawings.
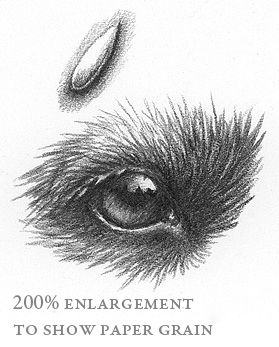
I can see applications for both sides of this paper. It is easy to scan, erases well, and is resilient enough to allow you to fine tune details and tones until you get them just right. Dual-sided papers can sometimes be a bit lacking in versatility because the manufacturing process doesn't have the same standards on each side. I would say that Canson has indeed made a truly 2-sided paper with both sides having independent and high-quality surfaces.
It will be interesting to see how the textured side responds to colored pencils. I would imagine it would be a great surface to accept numerous layers and being bright white should make the colors pop off the paper.
Summary
Overall I would praise the XL Recycled Bristol from Canson as a high-quality recycled (30% post consumer materials) paper. It's bright white, erases well, and is very resilient. With being acid free and lacking any added optical brighteners, it is a great choice and earns a Highly Recommended!
 |
| 4 out of 5 Pencils HIGHLY RECOMMENDED |
Thursday, September 23, 2010
Photos from Glacier National Park
 |
| Moose enjoying a morning dip. |
I've posted the albums both to a Flickr album as well as another Facebook album.
I hope you enjoy them.
Wednesday, September 22, 2010
Photos from our horseback trip
 |
| Theodore Roosevelt Memorial Ranch |
These are from our trip to the Theodore Roosevelt Memorial Ranch in May. It's on the Rocky Mountain Front and was our first experience in that area of the state. It was tremendous and it's very likely that we may go back from a return trip.
Monday, September 13, 2010
UPDATE: Uni-ball 2.0 mm Pencil Lead Sharpener!
In my previous post, Review: Uni-ball 2.0 mm Pencil Lead Sharpener, I indicated that if you broke the lead off in the sharpener that you might have killed it. Well, I apologize that I spoke a bit prematurely. While sharpening a pencil this morning, I found that you CAN, in fact, open the sharpener to access the sharpening blade and rescue your $9.00 sharpener from a broken pencil lead. Here is how to do it.
1) Look towards the bottom of the sharpener and find the small squarish piece. There is an identical one on the other side of the sharpener. You're going to need to grasp these with your thumb and forefinger as shown in the second photo.
 |
| 1) Locate the small square at the bottom of the sharpener? |
2) After firmly grasping these two squares, you're going to begin pull down away from the bottom of the sharpener, trying to slide out the inner sharpening mechanism.
 |
| 2) Grip the opposing squares VERY firmly. |
3) If you've got decent finger strength, you should be able to slide out the inner mechanism from the sharpener. If you need some assistance, I would recommend using the cushioned handle of a pair of pliers to assist you. Don't use the jaws or you'll either scratch the pencil sharpener or probably break it in the process.
 |
| 3) Slide out the inner assembly. |
4) Once you're able to free the sharpening assembly from the outer shell, simply remove the broken pencil lead from the sharpener being careful not to dull the sharpening blade. I typically use a wooden toothpick or if I don't have one on hand, an unbent paperclip (but be careful not to press firmly on the cutting edge of the sharpener.
 |
| 4) Remove the sharpener and remove the broken pencil lead |
I hope that helps! I certainly am very glad I found this fix since it isn't mentioned in the instructions from the sharpener and I'd hate to throw away a $9.00 sharpener simply because it has a piece of graphite wedged in the blade.
I would have liked to have seen instructions (or at least diagrams, considering the directions are in Japanese) showing how to open the sharpener. It is designed so well that it's not obvious through any wobbling or gaps that the device actually opens.
I also wanted to update the score for the sharpener since it no longer has the limitation I mentioned. I've updated the previous review and will include the new score here as well.
 |
| 4.5 Pencils Highly Recommended |
Friday, September 10, 2010
How To use the Staedtler 2mm tub sharpener
 I have seen several people post questions about how to use a Staedtler tub sharpener to sharpen their clutch pencils. Hopefully this little tutorial might help explain how to use one.
First, we need to look at the three holes on top of the sharpener. The biggest one, is obviously where the pencil will eventually go to be sharpened. The two smaller holes, however, aren't self-explanatory. The image below shows which hole is intended for sharp points and which is intended for dull points (which I hardly ever use).

First off, we need to press the button at the back end of the clutch pencil to extend the lead out a inch and a half or so (3cm) and drop the lead into the 'sharp tip' hole. Basically, touch the bottom of the hole with the lead.
 |
| Extend the lead until it hits the bottom |
The next step is to then press the button on the back end of the pencil again and this time, lower the pencil jaws until they touch the top of the tub sharpener. You want to make sure that the pencil lead is bottomed out in the hole while you're doing this step and you aren't picking the lead out of the hole before lowering the pencil to the tub.
 |
| Drop the pencil down until it touches the tub |
The final step is to remove the pencil from the 'sharp tip' hole and insert it into the tub itself and turn the pencil around until it stops making a sharpening noise against the metal sharpening ring.
 |
| Insert the pencil into the tub and turn to sharpen. |
Subscribe to:
Posts (Atom)