Wednesday, September 22, 2010

Photos from our horseback trip

Theodore Roosevelt Memorial Ranch
I've posted photos from our horseback trip to a Flickr Album and to a Facebook Album (you have to be a friend to view these) for those with a preference for either technology.

These are from our trip to the Theodore Roosevelt Memorial Ranch in May. It's on the Rocky Mountain Front and was our first experience in that area of the state. It was tremendous and it's very likely that we may go back from a return trip.


Monday, September 13, 2010

UPDATE: Uni-ball 2.0 mm Pencil Lead Sharpener!

In my previous post, Review: Uni-ball 2.0 mm Pencil Lead Sharpener, I indicated that if you broke the lead off in the sharpener that you might have killed it. Well, I apologize that I spoke a bit prematurely. While sharpening a pencil this morning, I found that you CAN, in fact, open the sharpener to access the sharpening blade and rescue your $9.00 sharpener from a broken pencil lead. Here is how to do it.

1) Look towards the bottom of the sharpener and find the small squarish piece. There is an identical one on the other side of the sharpener. You're going to need to grasp these with your thumb and forefinger as shown in the second photo.
1) Locate the small square
at the bottom of the sharpener?
2) After firmly grasping these two squares, you're going to begin pull down away from the bottom of the sharpener, trying to slide out the inner sharpening mechanism.
2) Grip the opposing squares VERY firmly.
3) If you've got decent finger strength, you should be able to slide out the inner mechanism from the sharpener. If you need some assistance, I would recommend using the cushioned handle of a pair of  pliers to assist you. Don't use the jaws or you'll either scratch the pencil sharpener or probably break it in the process. 
3) Slide out the inner assembly.
4) Once you're able to free the sharpening assembly from the outer shell, simply remove the broken pencil lead from the sharpener being careful not to dull the sharpening blade. I typically use a wooden toothpick or if I don't have one on hand, an unbent paperclip (but be careful not to press firmly on the cutting edge of the sharpener.
4) Remove the sharpener and
remove the broken pencil lead
I hope that helps! I certainly am very glad I found this fix since it isn't mentioned in the instructions from the sharpener and I'd hate to throw away a $9.00 sharpener simply because it has a piece of graphite wedged in the blade.

I would have liked to have seen instructions (or at least diagrams, considering the directions are in Japanese) showing how to open the sharpener. It is designed so well that it's not obvious through any wobbling or gaps that the device actually opens.

I also wanted to update the score for the sharpener since it no longer has the limitation I mentioned. I've updated the previous review and will include the new score here as well.
4.5 Pencils
Highly Recommended

Friday, September 10, 2010

How To use the Staedtler 2mm tub sharpener

I have seen several people post questions about how to use a Staedtler tub sharpener to sharpen their clutch pencils. Hopefully this little tutorial might help explain how to use one.

First, we need to look at the three holes on top of the sharpener. The biggest one, is obviously where the pencil will eventually go to be sharpened. The two smaller holes, however, aren't self-explanatory. The image below shows which hole is intended for sharp points and which is intended for dull points (which I hardly ever use).


First off, we need to press the button at the back end of the clutch pencil to extend the lead out a inch and a half or so (3cm) and drop the lead into the 'sharp tip' hole. Basically, touch the bottom of the hole with the lead.
Extend the lead until
it hits the bottom

The next step is to then press the button on the back end of the pencil again and this time, lower the pencil jaws until they touch the top of the tub sharpener. You want to make sure that the pencil lead is bottomed out in the hole while you're doing this step and you aren't picking the lead out of the hole before lowering the pencil to the tub.
Drop the pencil down
until it touches the tub

The final step is to remove the pencil from the 'sharp tip' hole and insert it into the tub itself and turn the pencil around until it stops making a sharpening noise against the metal sharpening ring.

Insert the pencil into the
tub and turn to sharpen.
You're done! Hopefully this resulted in a sharp pencil lead. If not, feel free to post a comment and I'll try to help out.


Review: Uni-ball 2.0 mm Pencil Lead Sharpener

Uni-ball 2.0mm
Pencil Lead Sharpener
I recently acquired the Uni-ball 2.0 mm Pencil Lead Sharpener from JetPens.com (a wonderfully indulgent online pen and pencil store - highly recommended). I thought it might be useful to share my experiences with it for use with 2mm clutch pencils.

I typically use Staedtler Mars-780 clutch pencils, which are 2mm drafting pencils that accept a wide range of pencil grades. They are the best compromise between a mechanical pencil (e.g., 0.5mm) and a wood-cased pencil. I have long been using the Staedtler tub sharpener but find it a bit inconvenient when doing art shows for a couple of reasons. First, it is a bit bulky so I have to find a pocket to fit it into, which leads to the second issue, namely that if you tip it upside down, the graphite shavings from your previous pencil sharpenings tend to fall out and turn your drawing kit into a fingerprinting scene from CSI.

Isn't it cute?
The clever rotating
cap design
In an attempt to resolve these two issues, I picked up the Uni-ball pencil lead sharpener. It's quite a cute little device. Made of medium-grade plastic, it has a wonderfully ergonomic design. There are no sharp edges or projections to catch on pockets or clothing so it can be slipped into a shirt pocket or even thrown into a pencil case along with your other supplies.

The mechanism is quite simple and basically allows you to sharpen any type of clutch pencil by simply extending the lead into the hole and turning clockwise. Unlike the Staedtler tub sharpener, it doesn't require the lead to be extended to a specific length.


I've included some shots to the right of the sharpener in use to give you an idea of its size - one word, it's small. Very handy but quite a bit smaller than you might imagine given the product shots.

There is one drawback to an otherwise perfect little sharpener. The  price. At $9.00 USD, it's simply too expensive to make it a simple solution for most casual pencil users. I draw 5 hours every day so this is sort of a no-brainer for me, especially when I'm at shows. But for those who are casual users, this is most likely too high.

If you happen to break the lead off in the sharpener, see my post on how to rescue your sharpener!

Overall, this sharpener earns 4.5 out of 5 pencils, and is highly recommended for those not on a tight budget and who don't abuse their pencil sharpeners. I would recommend purchasing this sharpener through JetPens.com but be forewarned, you might end up spending a lot more than you planned after browsing through their selection!

4.5 Pencils
Highly Recommended

Thursday, September 9, 2010

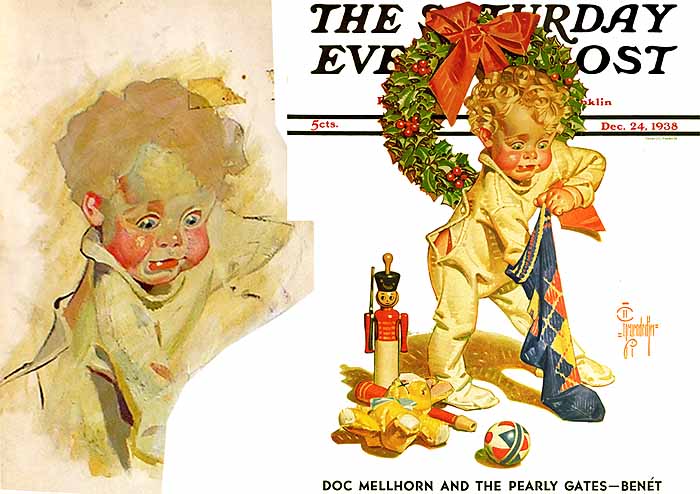
A sketch tribute to J.C. Leyendecker

Sketch from J.C. Leyendecker painting
James Gurney posted a great overview post of J.C. Leyendecker's drawing process. After looking over some of this basic technques, I was truly impressed by how confident Leyendecker's approach appeared on canvas. His strokes are purposeful yet organic. A rare combination, found only with the true masters. I took it as a challenge to create a sketch of his  little boy portrait included in Gurney's post.

The aspects of the painting that really stood out the most to me were the wonderfully bold line work in the painting. There's no doubt that he is a master illustrator and understood the importance of clarity of form. But the other aspect was the beautiful way he captured the reflected light along the cheek, lips and nose in the painting. It really speaks to his knowledge of lighting and his emphasis on keeping things bold yet simple.

I wasn't very familiar with Leyendecker's work, but Gurney's post really makes me intrigued with his techniques. I found a wonderful online portfolio of his sketches and studies for some of his Saturday Evening Post cover pieces. This one made me chuckle aloud...

Tuesday, August 17, 2010

A couple of new commissions recently completed

Here are a couple of commissioned drawings that I recently completed. It's been quite a while since I had time to work on some commissions but those familiar black labs that are so common around Missoula have made their reappearance. These two dogs were owned by the same family, Kodak (the first dog) is owned by the mom and Oak (the second) by the daughter. They are a wonderful family and were so understanding about the long delay in getting the drawings completed.

I should hopefully be delivering them sometime this week and am eager to see their reactions to the completed drawings. My wife is doing the framing and is putting her well-developed skills to the test with these two pieces.

I used two different papers for these commissions, the first was done on Canson's wonderful Artboards (bristol plate version) and the second was on my tried and true Strathmore 400 Series Bristol Smooth. Both dogs are around 7.5" x 10" on the page. I will try to post some photos of the framed pieces once they're completed.

Tuesday, July 27, 2010

Wednesday, July 21, 2010

Why I keep a sketchbook

There are a lot of reasons to keep a sketchbook and I wanted to offer my approach and what its benefits are to me as an artist.

First off, I wasn't always a sketcher. In fact, it wasn't until about 2 years ago that I started keeping a sketchbook and using it on a regular basis. I sketched infrequently, usually when bored and I never had a clear goal of what I was trying to accomplish when I did sketch. That changed two years or so ago when I decided to get "serious" about sketching.

What type of sketchbook?
People prefer different kinds of sketchbooks but for me, a spiral-bound sketchbook is my favorite. It offers two advantages that a book bound sketchbook doesn't possess. First, you can fold the sketchbook so that you can work on a single page in your lap. This also allows for easy scanning of the pages if you're so inclined. I find myself constantly fighting a book bound sketchbook to stay flat or to work at a specific angle. This isn't an issue with a spiral bound book. The second advantage is that you always have the option of ripping out a particularly bad sketch, although this will truthfully happen much less as your sketching improves. Nevertheless, it's still an option and gives you that extra bit of confidence to try outrageous ideas without the embarrassment of them being a permanent fixture in your sketchbook.


Book bound sketchbooks offer some advantages over spiral bound, namely that they smudge less than a spiral bound book where the pages have a greater tendency to rub against one another. I resolve this issue by using a workable fixative on all of my finished sketches. Another advantage of a book bound sketchbook is that you can draw on two pages at once, creating a working surface twice the size of the sketchbook. I find myself almost never requiring more space in my sketchbook because of the next topic...

What is the size of your sketchbook?I use a 9" x 12" sketchbook to provide plenty of real estate for sketching. I have grown extremely fond of Canson's Field Drawing sketchbooks as the paper is very tough, has just the right amount of tooth for easy sketches, and the pages are slightly off-white making it easier on the eyes when sketching in full sun.

What's your favorite pencil/pen you use when sketching?
Invariably, I use a combination of mechanical pencil whiles sketching. Most frequently will be 0.5mm pencils in 2H for layout of the basic sketch proportions, refining of the subject, and the basic shading. I use HB grade once I've established the roughed in sketch and for refining details. I'll employ a 2B for deep blacks or for accentuating very robust lines like on the shaded side of an object to really make it pop.

How is your sketching different than "drawing"?
My sketching tends to be focused more on form and proportions than getting bogged down with tone. This is why I typically use 0.5mm pencils rather than my standard 2mm clutch pencils that I use for the majority of my finished drawings. 

Do you carry a sketchbook with you all the time?  
I do not carry my sketchbook wherever I go but I do take a smaller 3" x 5" sketchbook when I think there might be some down time while I'm out. Otherwise, I'll simply carry a pocketable digital camera to take snapshots of things that catch my eye.

Do you have a mobile sketch kit?  What's included?
My mobile kit includes a Grande Pajaro field bag which is the perfect size to carry a 5.25" x 8.25" Moleskine sketchbook. I include my three 0.5mm pencils along with a kneaded eraser and a pair of dividers just in case I need to measure proportions in a book or I can hold them up to measure things at a distance.

How often do you sketch?  Daily, weekly, never?
I would estimate that I spend dedicated time sketching around 3-5 times a week. It varies based on what else I happen to be working on.


Why do you sketch?
In all honesty, to simply make me a better artist and because all of my heroes keep a sketchbook. Leonardo da Vinci is obviously one of the most renowned for his sketchbooks, but I also admire the sketches of James Gurney, who is one of the most visually creative artists around and produces amazing studies in his sketchbooks, and  Robert Bateman who said this about sketching:

"I have just discussed the most important aspect of my work. The technical details matter but are, to me, less interesting. I start with little sketches in pencil about the size of playing cards. I may do one or two or ten until I get the right composition. Since I was an abstract painter in my late 20’s and early 30’s, I can see the simplified shapes - or abstract qualities - on this small crude scale." - Robert Bateman

Tuesday, July 13, 2010

Moose Study completed

Just completed a new drawing titled, Moose Study. The reference was from a 2008 trip my wife and I took to Glacier National Park. We were out for an early morning hike along Swiftcurrent Lake when we spotted a beautiful moose cow wading in the water and eventually taking a morning swim around the lake.

I was able to capture quite a few frames while we stood quietly watching her. The original reference was quite a bit brighter and less intimate than the version I've gone with here. Hopefully it conveys the peace and quiet that we experienced that morning. It was a great day.

The drawing is 4"x6" and was drawn on a new paper for me, Canson's Illustration Board. It's a very smooth, extremely durable board that I will definitely be using again. It's great for smaller pieces and really takes the darks well (as is hopefully evident in this piece). I was able to erase details in the shadows and lift graphite very easily while working through the piece. My next piece will employ another version of Canson's artboard, but this time will be their Pure White Drawing Board. It will be interesting to compare the two papers.

Monday, July 12, 2010

Article on art forgery

An article appearing in The New York Times today describes an exhibit at the National Gallery in New York focusing on the tools used to ensure various works of art are authentic. One of my favorite quotes from the article is
"People love fakes because fakes play into the populist suspicion that much art is really just a scam, a suspicion encouraged by the fancy names wrongly attached to and insane prices often paid for the stuff."
Sometimes, this can be an accurate assessment when discussing high-profile works of art. Another quote might just edge out the previous one for its insight about another artwork of dubious origin:
"Its role in the evolving narratives of art history changes. Its price can go up or down. But cost is not value."
 This quote reminds me of the book, Life Inc. by Douglas Rushkoff wherein he states,
"We look to the Dow Jones average as if it were the one true vital sign of our society's health, and the exchange rate of our currency as a measure of our wealth as a nation or worth as a people."
Does a work of art have less artistic value if it's determined that the artist isn't famous? It's an interesting dilemma and one that should make us all pause when admiring art and evaluate it on its own merits. This, of course, is different from setting a price in an auction based on the artist's name -- different market (literally) and the "value" of the artwork is its market price, not necessarily its artistic value.


The article concluded with this reminder:
"But look, never mind what the label says, and you may notice something else about the picture, too, some other truth.
It’s beautiful."